Are you experiencing crackling or popping sounds in your audio?
Is your audio quality damaged or compromised with static noises?
Let's troubleshoot this issue, as there may be different reasons!
Check your Voicemod settings
If you are using Voicemod V2 please follow the next couple of steps:
- Go to Settings - Audio - Advanced Audio Settings
- Enable the "ELIMINATE POPPING" toggle
- Try now if the problem is solved. If not, go to the next step.
Maintaining the Exclusive mode in the microphone improves the response time, if you experience problems related to audio crashes try to change this configuration:
- Go to Settings - Audio - Advanced Audio Settings.
- Disable the "MIC EXCLUSIVE MODE" toggle.
- Try now if the problem is solved. If not, go to the next step.
(The steps above are only for Voicemod V2)
It is also very important that you have an appropriate input level. The higher the sensitivity of the microphone, the easier it is to lower the quality of your voice.
Voicemod V2
In Voicemod V3 you will be able to see a line of dots indicating the optimal levels your microphone should handle for best quality:
Voicemod V3
After that, there are some other steps that we need you to take into consideration:
- Setting the correct Sample Rate.
- Disable your device "Audio Enhancement"
- Change your PC Power Plan.
- Set your Input device as your default device within Windows and disable "Stereo Mix" if enabled.
- If you encounter Crackling while using Discord, you may need to change certain settings.
- Change your Audiodg.exe CPU Priority and Affinity.
Set the correct Sample Rate
The audio flows from the microphone to Voicemod and from there we create two output signals; one goes straight to the headphones and the other goes through the Voicemod Virtual Audio Device to our Voicemod Virtual Microphone. If you have different sample rates in the devices where the audio is flowing, we have to resample each audio package, which means, a lot of processes.
You have set your input and output Sample Rate of all your devices to 16bits 48.000 Hz*:
- Close the Voicemod app.
- Go to the system tray on the right side of your Windows Bar (where the time is, the audio icon, etc...).
- Find the Voicemod app icon.
- Right-click on the icon.
- Exit.
-
Go to the Sound control panel window via the Start Menu, the sound icon on the taskbar, or by running a command:
- To use the Start Menu, navigate to the Windows Start Menu > PC Settings > System > Sound > Sound control panel.
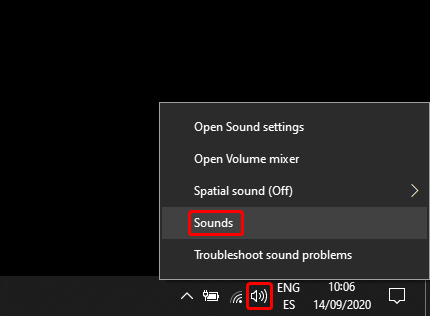
- Or use the sound icon, right-click the sound icon on the taskbar and select Sounds.
- Press the Windows key + R and write rundll32.exe Shell32.dll,Control_RunDLL Mmsys.cpl,,0
then click on OK.
- Go to Recording Tab.
- Double click on your Microphone to open the Properties Tab.
- Go to Advanced.
- Set the Default format to 16bits 48000 Hz.
If you are using more devices in your audio flow, set all of them to 48000 Hz in the same way.
- Open Voicemod.
- Go to Voicemod -> Settings.
- Select again your Microphone and Headphones.
*NOTE: If you cannot change the sample rate in the Windows settings, you may have to use the driver software to change it.
If you still can't change it, we recommend changing it through another program: Voicemeeter.
At the end of this article, we explain how to:
https://support.voicemod.net/hc/en-us/articles/4417354931730-Audio-Wizard-error-Check-your-sample-rate
Disable the audio enhancements
In order to fix the high CPU usage, disable the audio enhancements processed by the audiodg.exe file.
To disable the audio enhancements, use the following steps:
a. Right-click the speaker icon in the lower right corner.
b. Select Playback Devices from the menu. A list of devices should appear on the screen.
c. Double-click the device that has a green checkmark. The properties windows for that device should open.
d. Click the Enhancements tab at the top.
e. From the list of enhancements, uncheck all of them or click the Disable all enhancements checkbox.
f. Click the OK button to save your changes and close the window.
g. Click OK to close the Playback Devices window.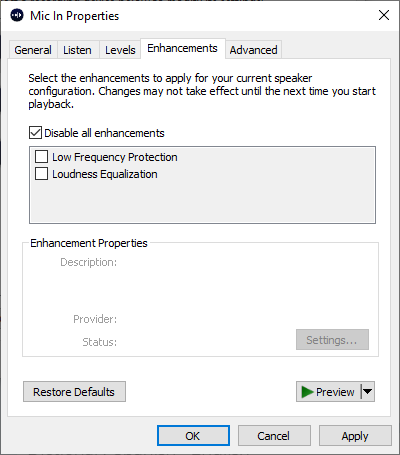
Change your Power Plan
We use a small percentage of CPU to process the audio, but we need to process the audio all the time.
If there is another application/game that is consuming all the CPU, maybe this can be affecting our audio processing. Take special care and closing any window or vumeter monitor related to the sound settings or real-time control of the sound.
Also, close all instances of any sound settings and sound visualization apps.
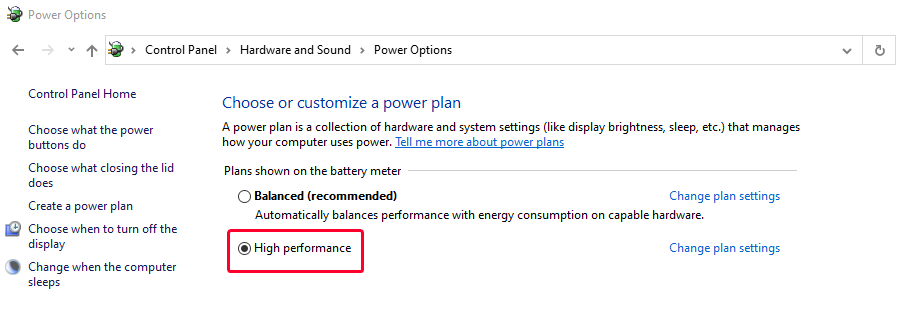
You should adjust the power plan for the best possible performance.
- Settings/Power&sleep/Additional power settings (right-column)/Create a power plan/High performance.
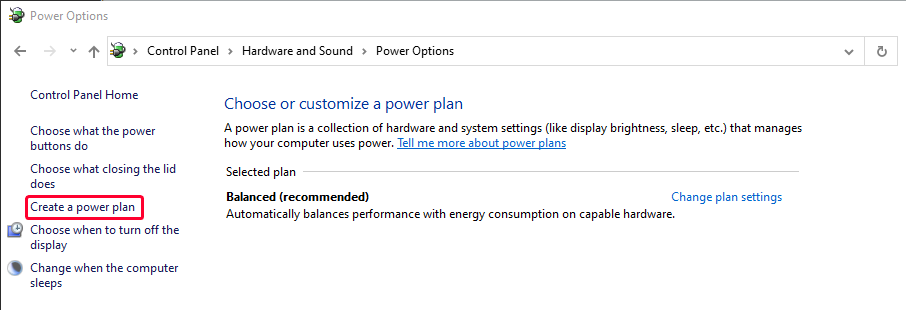
If you don't have that plan, you have to create it:
1.- Just click on 'Create a power plan'
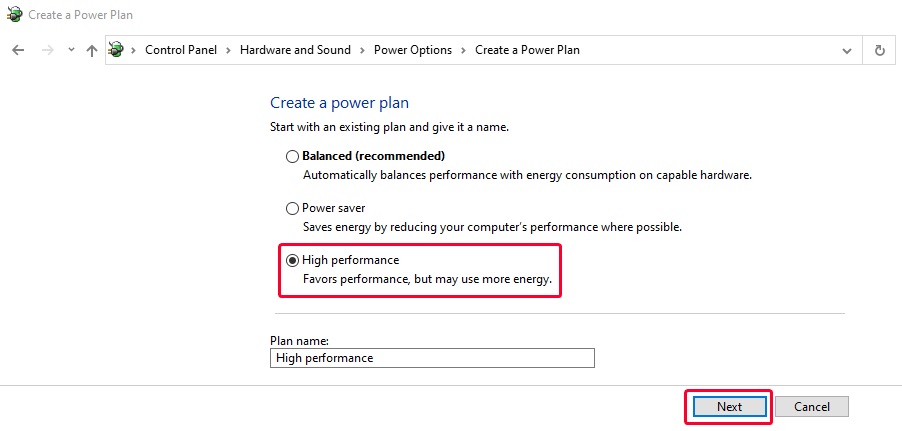
2.- Select the High performance plan and click on 'Next'.
3.- And it ends by clicking on the create button.
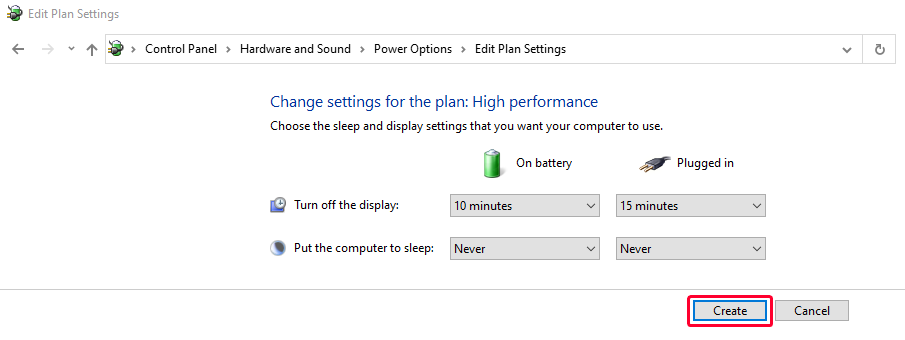
Remember to select the new plan (High performance) before closing the window.
Set your Input as Default and disable Stereo Mixer
- Go to the "Sounds" menu (right-click on
 ):
):
-
Select your microphone as the default input device in Windows.
Click on your microphone and click on "Set Default":
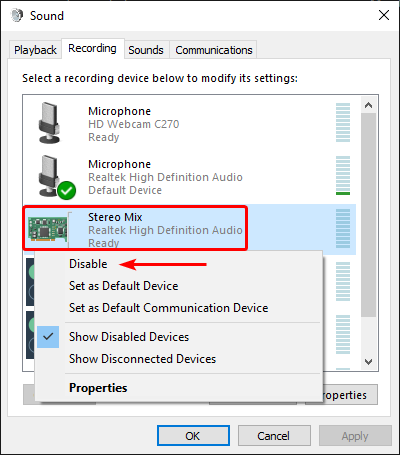
- And, if you have a device called "Stereo Mix", disable it.
In the "Recording" tab, select the "Stereo Mix" devices, right-click - Disable:

Check your Discord Settings
-
If you are using Discord, the audio subsystem should be set to "Standard" mode*. Go to "Settings"
 and there to "Voice & Video" tab. Scroll down to the "Audio Subsystem" drop-down list and select "Standard" option.
*Some users have reported that the Legacy audio subsystem works better for them. If the problem persists with the Standard audio subsystem, please try the Legacy audio subsystem.
In addition, please note that the Discord test is currently failing in some situations* and you should test it on call directly.
*You can check this here:
https://www.reddit.com/r/discordapp/comments/npgp8x/voice_randomly_cutting_out_in_mic_test/
https://www.reddit.com/r/discordapp/comments/nxw04t/discord_mic_volume_fluctuating/
-
In addition, set all these options in this way:
Change your Audiodg.exe CPU Priority and Affinity
If none of this has worked for you, it is a performance problem and you need to optimize the work of your processor by following these steps below:
- Firstly, do a full reboot of the computer and open Voicemod only.
- Go to the Task Manager and Run as administrator:
- Go to the "Details" tab and select audiodg.exe.
- Right-click to change the priority to High:
- And after confirming the priority change, you have to change the affinity to a single core:
Unfortunately, the priority and affinity setting changes are not saved when the computer is turned off and they get reset every time you reboot it, so, if this has worked for you, you must follow these steps to set this process automatically at every boot-up of your PC:
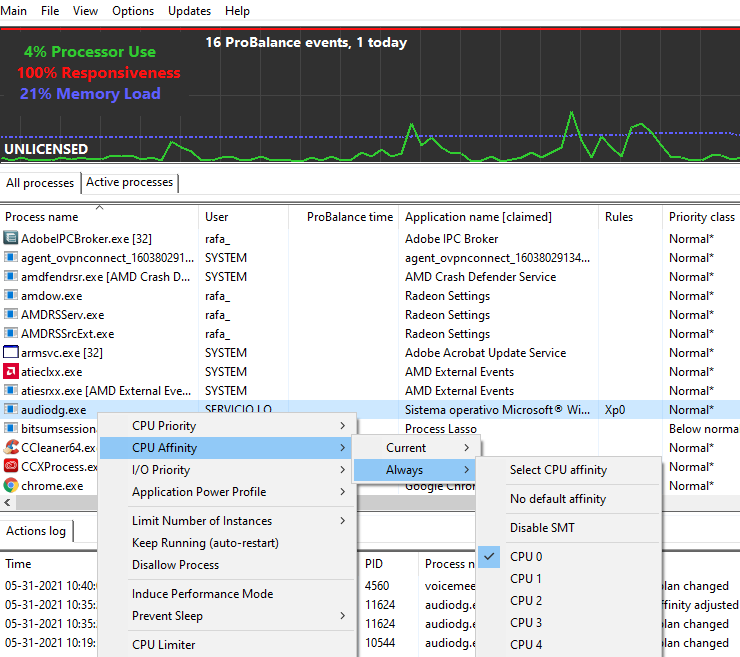
- Install the software Process Lasso.
- Once installed, run it and find the audiodg.exe process within the software and set the priority and the affinity as indicated previously.
Need more help? Click HERE